Tuesday, February 23, 2010

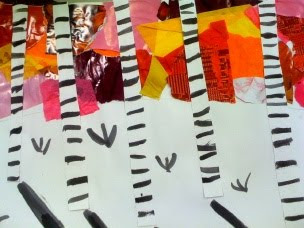
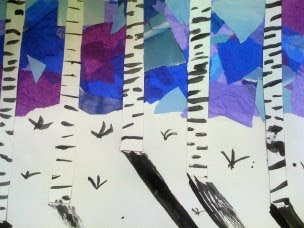
Warm and cool Landscapes with Monet


DISCUSSION: Warm and Cool Colors
Quickly touch on Color wheel primary and secondary color schemes
separate the color wheel to illustrate warm and cool colors

Pick a landscape piece from Monet with COOL COLORS
How do we feel when we look at the painting
How would it smell if we were there?
What would you touch?
Are we safe?
Pick a landscape piece from Monet with Warm Colors
Same ? as above
ARTIST: MONET (1840-1926)
French Painter
Studied art in Paris
Father of IMPRESSIONISM
Impressionists: attempted to capture a visual impression of a scene
Esp. with the natural light
Monet would paint the same scene over and over in different light of the day

For more on Claude Monet: http://en.wikipedia.org/wiki/Claude_Monet

LANDSCAPES:
Foreground
Background
Horizon line
Things in the foreground are bigger and more detailed
Things in the background are smaller and less detail
Perspective

PROJECT: two weeks: create a landscape using warm OR cool collage
Step1: Create a horizon line
Step2: Fill in the background with a warm OR cool multi media collage
Step3: Cut Out trees from white paper
Step4: paint birch black lines on each of your trees
Step5: Glue your trees on your paper overlapping your collage work
Step6: add tree shadows in greys
Step 7: Add details like grass in gray

MATERIALS:
Week1: Pencils
Glue
Collage materials of all sorts tissue, magazine, paper
scissors

Week2: scissors
Watercolors
White scrap paper for trees
Brushes
Water
Glue

This lesson plan was inspired by DEEPSPACESPARKLE.com: http://deepspacesparkle.blogspot.com/2009/03/multi-media-winter-birch-trees.html

Sugar Skulls


DISCUSSION: Halloween and All Saints Day
Was anyone invited to an All Saints Day Party on November 1?
It is a celebration of people you have lost in your life
Look at several photos of sugar skulls and get feedback from the students

ARTIST: Sugar Skulls
Sugar art was brought to the New World by Italian missionaries in the 17th century.
The first mention of sugar art was from Palerm when little sugar lambs were made.
Mexico, abundant in sugar production and too poor to buy fancy imported European decorations,
They learned quickly from the friars how to make sugar art for their festivals.
Clay molded sugar figures of sheep and sugar skulls go back to the Colonial Period 18th century.
Sugar skulls represented a departed soul
the name is written on the forehead and was placed on the gravestone to honor the return of a particular spirit. Sugar skull art reflects the folk art style of big happy smiles, colorful icing and sparkly tin and glittery adornments. Sugar skulls are labor intensive and made in very small batches in the homes of sugar skull makers.
These wonderful artisans are disappearing as fabricated and imported candy skulls take their place.

for more information on this artistic tradition please visit: http://en.wikipedia.org/wiki/Sugar_skull

PROJECT: Create a Sugar Skull on your paper (could also be the whole body)
Step1: On BLACK paper: Draw your skull with white oil pastels
Step2: Paint in with white paint
Step3: With bright colored paint begin to add Flowers, stripes, dots to adorn the skull
Step4: Take you time and add tons of details like our Mexican sugar artists.

MATERIALS:Black paper
White Oil pastels
White paint
Bright colored paint

This project was inspired by DEEPSPACESPARKLE.com, for more information: http://deepspacesparkle.blogspot.com/2009/10/day-of-dead-dia-de-los-muertos-first.html

LINE WITH JASPER JOHNS


DISCUSSION: LINE
can we have art without line?
How can simple line express our mood?
Where do we see line everyday?
What types of lines do you enjoy and why?

Show Jasper Johns piece: numbers in color

ARTIST: Jasper Johns
(born May 15, 1930 in Augusta, Georgia, United States)
American contemporary artist who works primarily in painting and printmaking
Jasper Johns grew up in Allendale, South Carolina.
Recounting this period in his life, he says, "In the place where I was a child, there were no artists and there was no art, so I really didn't know what that meant. I think I thought it meant that I would be in a situation different than the one that I was in."
Johns was raised, primarily, by relatives after he was abandoned by his mother.
He began drawing when he was three and has continued doing art ever sinc
Best Known for his painting of the Flag
Associated with Pop artists
He seemed to be seeking to create meaning solely through the use of conventional symbols.

for more information on Jasper Johns: http://en.wikipedia.org/wiki/Jasper_Johns

Oil pastels: remember if you layer oil pastels they will make a new color.

PROJECT:
Step1: on 12x9 paper draw two horizontal lines and two vertical lines creating 9 boxes.
Step2: with simple Lines, draw numbers 1-9 in the boxes
Step3: use thick oil pastels to go over each number
Step4: Fill in each box as you see fit. LEAVING NO WHITE PAPER BEHIND!!!

MATERIALS:
white paper 9x12
Oil pastels

Miro Lines


DISCUSSION:
LINE: what is a line
What kids of lines can you think of?
Do lines express emotion?
What happens to a line when it connects with another line?

Joan MIRO: 1893-1983
Spanish painter, sculpture
Would not commit to a certain art style
Associated with the surrealists
Born to the families of a goldsmith and watchmaker,
young MirĂ³ was drawn towards the arts community that was gathering in Montparnasse
1920 moved to Paris, France. He was influenced by the poets and writers,
he developed his unique style: organic forms and flattened picture planes drawn with a sharp line.
He would dream about his paintings
He would see the shapes on the ceiling

ART WORK
Look at Miros’ art work and talk about how he created it.

PROJECT:
Step1: With a black marker connect a line to make a circle in the middle of your page
Step2 Black Marker connect a line to create a body for your circle
Step3: draw random lines for a background
Step4: draw random lines/shapes coming off your new person
Step5: using colored markers begin to fill in some of the shapes you have created
Step6: you can also draw more lines with your colored markers

MATERIALS:
colored markers
Black sharpies
White construction paper (12x18)cut in half (9x12)

Spray Bottle Still Life with Seurat


Preschool-Second grade
PREPARATION: add water to tempura paint making it very watery
create 4-6 different colors
fill travel spray bottles and make sure they mist when sprayed
Cut 10 apples, 10 pears, 10 bowls, 10 oranges, and 10 bananas from
card stock add blue tape to the back of each

DISCUSSION:
What is a still life? Pick any still life example of a fruit basket to show the class
Have you heard that word before?
ART A still life what do you see?
Apples and a basket
How do the colors make you feel?
What is happening in the piece?
A STILL LIFE is a collection of objects that don’t move that artists paint or draw

Show Sunday afternoon in the park : what is happening in this piece of art?
How would it feel outside if you were there? Hot or cold?
How might it smell?
Are the people happy or sad?
What sounds would you hear?
EXPLAIN THE DOTS IN THE PIECE

ARTIST: Georges Seurat 1859-1891
French Painter
Invented pointillism
He studied the relationship between lines and images and the effect light had on color
He wanted to know more about the emotional effect of color
He influenced science with his studies of colors

PROJECT: create a dotted still life using spray bottles:
Step1: On your white card stock tape on a pear
Step2: Tape on a banana
Step3: Tape on an Apple
Step4: FINALLY tape on a bowl on top
Step5: Using a spray bottle spray on your first color
Step6: spray the second color
Step7: spray the next color continue until no more colors DO NOT GET TOO MUDDY
Step 8: remove fruit reviling the still life

MATERIALS:
PRE-PREPARED cut out fruits 10 of each
Blue painters tape
Spray bottles with 4-6 colors of tempura paint mixed with water
White tag board

Adaptations: The project is easily adapted to an older age group. I did this project with K-second graders by simply asking them to draw and cut out their own fruit. Bringing a bowl of fruit for the students to look at would be helpful. The steps for this project would be:

PROJECT:
Step 1: Look at the fruit bowl
Step2: Draw the bowl
Step3: Draw each of teh fruits seperatly so you can easily cut them out
Step4: Cut out each of your fruits and yoru bowl
Step5: Use the blue tape to tape them back together on your thick paper
Step6: Pick a color and spray your paper
Step7: Remove a fruit
Step8: Pick another color and spary your paper again
Step9: Remove your fruit
Step10: Continue with the above steps until you have used each color and all of your
fruits are removed

Materials:
Two sheets of tag board for each student
Pencils
scissors
blue painters tape
4-6 spray bottles of watered down tempura paint in different colors

Here are some examples of work from this age group:

Wednesday, February 10, 2010

TEXTURED SUNFLOWERS WITH VAN GOGH


PREPARATION:
I created textured paint in advance. It is tempura paint in 3 values of yellow I value of green (for centers and stems) mixed with Flour and sand for texture.

DISCUSSION:
Texture? What is it?
What does your hair feel like?
What does the bottom of your shoe feel like?
What do your pants feel like?
What does tree bark feel like?
Some things are rough like tree bark and the bottom of our shoes
Some things are soft like kittens and our hair
This is Texture.

Can we see texture?
Can you smell texture?

Look at Van Gogh’s sun Flowers
What do you think?
How do you think they would feel if we were allowed to touch them?
How would them look if we were in a gallery with them?

READ: Pat the Bunny and talk about different textures in the book.

ARTIST:
VAN GOGH
Vincent van Gogh (30 March 1853 – 29 July 1890)
painter
His work had a far-reaching influence on 20th century art
Known for his vivid colors and emotional impact.
He suffered from health issues
died largely unknown, at the age of 37,
sold only one painting while he was alive
for more information on Van Gogh: http://en.wikipedia.org/wiki/Van_Gogh

PROJECT: Create Van Gogh Style textured flowers
Step1: draw this vase on you paper. Start with two lines up and one line across
Step 2: write your name (or the first letter of your name) across the line like Vincent Van Gogh did on his piece
Step3: using large brushes make Smash flowers by smashing your brush on the paper to form a circle flower. Use all three colors
Step4: paint your center and stems using green and a small brush

MATERIALS:
Cream Tag Board
Orange matting paper
3 values of yellow paint
Green textured paint
Flour to add texture to the paints
Glue add to the paints
Large Paint brushes
Small paint brushes

Snowmen with Maud Lewis


PREPARATION:

I created our snow paint before we began.
It is half Shaving cream and Glue.

Discussion: Folk Art
A folk Artist is an untrained artist someone who has not studied art in school
Are you guys folk artists?

Maud Lewis is a Folk Artist
1903-1970
Nova Scotia, Canada
Born in Ohio
She suffered from disabilities as a result of juvenile rheumatoid arthritis
lived most of her life in poverty with her husband in Marshalltown.
he began her artistic career by hand-drawing Christmas cards.
These proved popular with her husband's customers as he sold fish door to door and encouraged her to begin painting.
She used bright colours in her paintings and subjects were often of oxen teams, horses, or cats.
All of her paintings are of outdoor scenes.
Her house was one-room with a sleeping loft and is now located in the Art Gallery of Nova Scotia in Halifax.
Most of Maud Lewis' paintings are quite small - often no larger than eight by ten inches
she is known to have done at least three paintings 16 inches by 20 inches.
Her technique consisted of first drawing an outline and then applying paint directly out of the tube.
She never mixed colors.
She painted on everything in the home as she often did not have enough money to buy supplies
for more information on Maud Lewis: http://en.wikipedia.org/wiki/Maud_Lewis

Read a book The Snowy Day or any snow book.

PROJECT: On blue paper create a snow scene
Step1: Paint a tree with no leaves
Step2: put a red bird on one of the branches
Step4: Using the “snow paint the bottom of the page
Step5: paint in a large circle
Step6: paint a medium circle on top
Step7: paint a small circle on top (snow man)

MATERIALS:
Shaving Cream
Glue
Red Paint
Brown Paint
Blue paper 9x12

Tinting Landscapes with Monet


PREPARATION:
I pre-cut trees that could be glued on by the students
I filled easy squirt bottles with blue, green and white paint so that I could squirt blue and white paint on to the top of their paper to make sky and green and white piant onto the bottom of their paper make grass.
I also created the fall colored confetti that make the leaves.
Discussion: TINT: What happens when we add white to colors?
Where do we see white in nature?
Why do we need white in art?

Claude Monet: (14 November 1840 – 5 December 1926)
He was a founder of French impressionist painting.
He was interested in how light hit objects.
He would paint the same landscape at different times of the day
The term Impressionism comes from the title of his painting Impression, Sunrise.
For more information on Claude Monet: http://en.wikipedia.org/wiki/Claude_Monet

Read the book: what color is nature or a book that illustrates color and nature.

PROJECT: Make a monet landscape by adding white to colors:
Step1: using white and blue paint the sky on half the paper
Step 2: using white and green paint the grass on the paper
Step3: glue on a dark tree
Step4: glue a light tree on top of the dark tree
Step5: place glue on the top of the tree
Step6: sprinkle your leaves in all different values

MATERIALS:
Brown trees in to values
Glue
Confette in different values
White blue and green paint
Brushed
Tag board


I adapted this lesson plan from another of my favorite sites, ARTLESSONSFORKIDS. for more information on this project please visit: http://www.artprojectsforkids.org/2007/12/fall-watercolor-tree-collage.html. thanks!!!

Leaf Prints With Georgia O’Keeffe


DISCUSSION: Color
What is color?
Why is it so important in life/art?
Where does it come from?
Where do we see all the colors in nature

Primary Colors? What are they
Secondary colors? Where do they come from?
Color wheel: what is it?

Read the book “Who loves the fall?” or another book that illustrates color change.

ARTIST: Georgia O'Keeffe
1887-1986
Shw was an American artist.
O'Keeffe was a major figure in American art from the 1920s.
She is chiefly known for paintings of flowers, rocks, shells, animal bones, and landscapes
she synthesized abstraction and representation.
Her paintings present crisply contoured forms that are replete with subtle tonal transitions of colors.
She often transformed her subject matter into powerful abstract images.

PROJECT: Print leaves on black paper with mixing color background
Step1: Paint the back of your leaf with white paint
Step2: print it on the black paper
Step3: double dip your cotton ball into two different paint colors
Step4: Paint the background of the work by printing your cotton balls

Materials:
Red, blue yellow paint
Cotton Balls
Leaves
White paint
Black Paper

LINE WITH MIRO


Discussion: line:
What is line?
Why do we need it in art?
How does it change or lives everyday?
Use dry erase board as visual show all different lines
Talk about where we see them in nature.

Read Harold and the purple crayon or another book that illustrates line

Artist: Joan Miro (1893-1983)
Spanish painter, sculpture
Born to the families of a goldsmith and watchmaker,
1920 moved to Paris, France. He was influenced by the poets and writers,
he painted in sharp line, organic forms and flattened picture planes
He would dream about his paintings
He would see the shapes on the ceiling

PROJECT: Create a Miro inspired artwork with finger painting
Step1: finger paint with black paint use only line
Thick line
Thin line
Curved line
Zig Zag Line
Crooked line
Sharp line
Step2: fill in your background (around your lines) with colors
Step3: wash your hands

MATERIALS:
black paint finger style
Watercolors
White paper

Tuesday, February 9, 2010

Kandinsky Circles


Preschool-second grade

PREPARATION: pre-cut small, medium, and large circles in all different colors

DISCUSSION: Shapes focused on circles
What is a circle?
Where do we find circles
How do circles help us everyday? Cars, planes, bikes, putting our clothes on
Lets see how many there are in the classroom

Show Kandinsky's circles and discuss all aspects with the students

READ A BOOK THAT ILLUSTRATES CIRCLES IN DAILY ACTIVITIES

ARTIST: Wassily Kandinsky
1866-1944
He was excited by COLOR as a child
He related painting to playing music
Credited with painting the first modern abstract works

PROJECT:
At the red table
Pick circles of all different sizes: small medium large
First put large circles on your paper
Then layer medium circles on your large circles
Then layer small circles on your medium circles

MATERIALS:
Pre-cut circles in three sizes
Glue Sticks for small hands
Black paper


This project is easily elevated for K-second grade by having the students cut their own circles for the project. Not only do you get more organic results but the kids get to improve their cicle cutting skills. Here is an example from that age group:


I adapted this great idea from DEEPSPACESPARKLE for additional information on her AWESOME lesson plan please visit: http://deepspacesparkle.blogspot.com/2009/01/kindergarteners-do-kandinsky.html