Showing posts with label card stock. Show all posts

Friday, February 20, 2015

Non-Objective Pattern Sculptures with Sol Lewitt


Lesson Objective:  
Work with the elements of line and space 
Work with the art principles of pattern and unity
Create a 3-D composition
Use paper Construction

Key Vocabulary: 
Non-objective sculture
Free standing Sculpture
Unity

Materials: 
Note Cards in two sizes
Glue
Black Card stock base
Fine point black sharpies

Focus Artist: Sol Lewitt: Pattern and structures 
Also study: Revisit:  Dongo Artwork to review and connect. 
Project requirements: 
Drawing is non-objective and shows attention to detail
Drawings incorporate 20 different patterns 
Small Group Critique at Midway point
Sculpture is free standing and non-objective
Shows unity through repetition of color and shape. 

Assessment:
Informal: Small Group Critique
Formal: Final Grading

CA Art Standards
1.1 Identify and use the principles of design to discuss, analyze, and write about visual aspects in the environment and in works of art, including their own.
1.4 Analyze and describe how the composition of a work of art is affected by the use of a particular principle of design.
2.1 Solve a visual arts problem that involves the effective use of the elements of art and the principles of design.
2.2 Prepare a portfolio of original two-and three-dimensional works of art that reflects refined craftsmanship and technical skills.

Modifications: 
English Language Learner: Handout for project, project samples, Power point with visuals, Critique for additional understanding, Demonstration of techniques
Special Needs: Handout for project, project samples, Power point with visuals, Critique for additional understanding, Demonstration of techniques
Accelerated Learner: Expand on skills learned to create a unique project. 
Advanced art students will be asked to increase the difficulty of their pattern making and increase the final number of  paper rolls from 20 to 30. 

Scaffolding adaptations: 
Students will see several examples of each art element in different artwork shown in the power point. Notes on the elements of art will be taken throughout discussions for added understanding. Creating each side and Constructing the cube will be demo started in class using guided instruction. 

Day 1: 
Go Through Power Point Slides
Review: Dango Artwork to connect learning
Discuss Sol Lewitt’s artwork
Interpret line drawings as Principles and elements of design
State Project Objectives, Materials, Project Requirements, Due Dates
Plan ideas for patterns 


Day 2-4: Students will create 20 different patterns on 1/2 index cards

Day 3: Art Link: Peer Critique feedback on cards 
Focus on Line and pattern
Day 4: 
Art Link: Have students draw their ideas for construction
Roll 5 Cards to begin construction on Day 5
Day 5-8: Students will roll and construct sculptures. 
Day 6: Peer critique on cards and sculpture progress. 
Continue making cards throughout. 

Students who work quickly could be asked to create additional patterns on Cards
Students who work slowly will be checked-on regularly with possible adaptations of fewer then 20 notecards. 

Last Day of Sculpture: 
Art Link: Self Critique: 
Describe, Analyze, Interpret and Evaluate. Draw on your notes and the rubric to complete for 10 points. 
Complete Rubric and turn in sculpture. 

Evaluation: successful for all engaged students and all abilities of students. Wonderful outcome

20 pattern minimum is accomplishable in the 3 days of studio time. 


Tuesday, July 24, 2012

Texture Printmaking with Wayne Thiebaud


Discussion: 
What is texture? 
How does your hair feel?
How does the bottom of your show feel?
Do they feel the same?
What about tree bark vs. A puppy? 
Art and texture: 
The job of an artist is to create visual texture
A dog might look fluffy and a marble would be shiny and smooth
Printmaking: do you print things at home? 
How do you print them?
How do we print in art: smash pictures or folding pictures in half
There are many techniques in art for printmaking
Mono-print: creating one print from an original piece of art
Look at Wayne Thiebaud’s Gum ball machine painting and discuss how he might have drawn it. 
ARTIST: Wayne Thiebaud 
(born November 15, 1920) 
He is an American painter 
His most famous works are of cakes, pastries, boots, toys and lipsticks
He is associated with the Pop art movement because of his interest in objects of mass culture,
although his works, executed during the fifties and sixties, slightly predate the works of the classic pop artists. 
Thiebaud uses heavy pigment and exaggerated colors to depict his subjects
well-defined shadows characteristic of advertisements are almost always included in his work.
Project: Create mono-print gum ball machine from sand paper
Step1: on your 4x6 piece of sand paper: with a black oil pastel, draw a large circle on the top half
Step2: Draw a square underneath your circle
Step3: add a half circle on top of your first circle
Step4: add a small circle inside your square
Step5: color in your square and small half circle with the same color
Step6: color in your small circle black to show where the gum balls come out
Step7: fill your machine with different colored gum balls
Step8: once complete, adult uses an iron to melt picture onto your tag board paper
Note: These come out like a print, they might not be exact. 
MATERIALS: 
Oil pastels
Sand paper (light)
Iron
Heavy card stock or tag board paper


I loved the addition of the 25 cents but you might warn young students that it will print backwards. 

Thursday, October 20, 2011

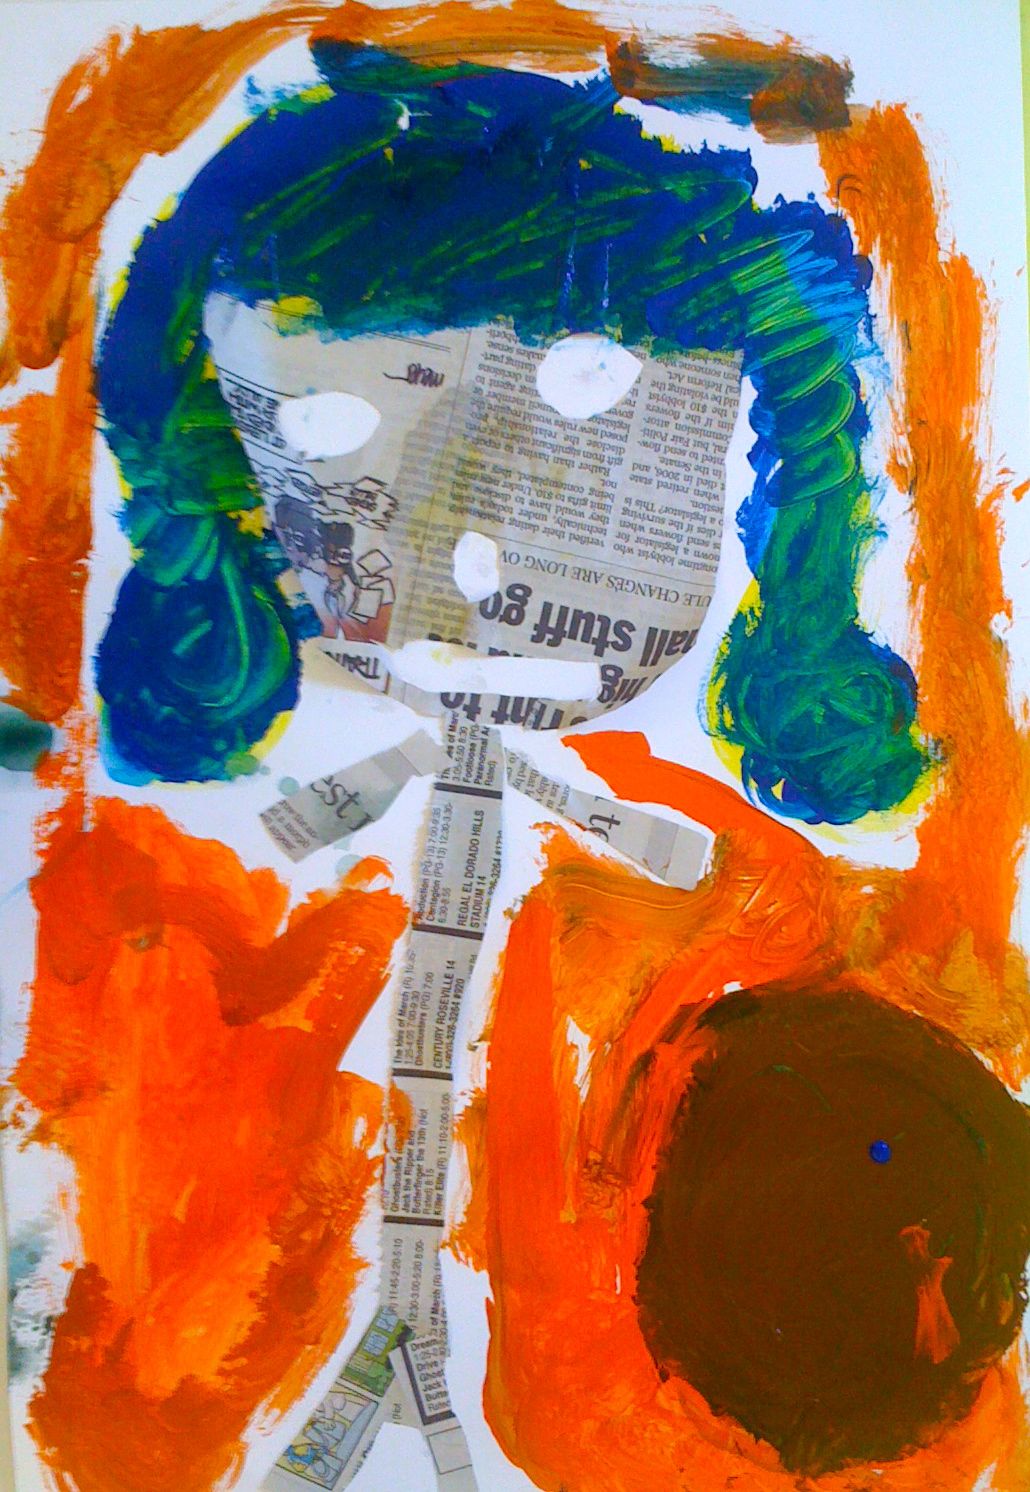
Facial Proportion with Romare Bearden


Discussion
Facial Proportion
Colors
warm and cool colors
complementary colors
neutral colors
Shape
collage
artist, Romare Bearden

His piece Mother and Child, 1968
on display at the Crocker Art Museum, Sacramento, CA

ARTIST: Romare Bearden, (1911-1988)
American, Collage 
  • Born in Charlotte, North Carolina, and died in New York City at the age of 76. 
  • His life and art are marked by exceptional talent, encompassing a broad range of intellectual and scholarly interests, including music, performing arts, history, literature and world art. 
  • Bearden was also a celebrated humanist, as demonstrated by his lifelong support of young, emerging artists.
  • Recognized as one of the most creative and original visual artists of the twentieth century
  • He experimented with many different mediums and artistic styles, but is best known for his richly textured collages, two of which appeared on the covers of Fortune and Time magazines, in 1968. 
  • An innovative artist with diverse interests, Bearden also designed costumes and sets for the Alvin Ailey American Dance Theater, and programs, sets and designs for Nanette Bearden's Contemporary Dance Theatre.
Facial Proportion: The face extends from the top of the head to your chin
This puts your eyes right in the Center of your face
The bottom of your nose falls in the Center of your eyes and chin
Your mouth is in the Center between your bottom of the nose and your chin
Let’s try this with newspaper
Step1: cut out a circle roughly the size of your hand from newspaper
Step2: fold your circle in half and cut out two ovals (eyes)
Step 3: fold your “chin” to your eye fold
Step 4: cut out a small triangle or circle
Step5: fold your “chin” to your nose fold
Step6: cut out a long oval for a mouth shape
Project: 
Step1: glue down your newspaper face to the card stock on the top and slightly right
Step2: Cut out a strip of newspaper and glue it along the bottom of your page
Step3: using yellow add some hair. This could be thickly applied
Step4: using your first complementary color add shape somewhere on your page
Step5: using the second complementary color fill in the background
  • first: go around the shape
  • second: paint over the newspaper strip but make sure you can see some of the newspaper through the paint
  • third: fill the page with the color

Step6: mix your two complementary colors on your plate
Step7: somewhere on your painting add a neutral shape
Materials: 
paint in complementary colors
newspaper
glue sticks
Scissors
paper plates or trays for paint
paint brushes
water 


Saturday, October 1, 2011

Imagination "Outrigger" Paintings with Robert Hudson


Robert Hudson's
Outrigger is on display at the Crocker Art Museum in Sacramento, CA
Discussion: Find this sculpture in the museum and sit for discussion
What do you see here?
Is it an animal
How is it different from the painting we have seen?
Do you think the other side is painted or is it blank?
How many animals do you see?
What two different items are on top?
Why antlers? What is the artist trying to say? (NO WRONG ANSWERS)
How does the artist use color? Value?
ARTIST: Robert Hudson (born 1938) is an American artist who was born in Salt Lake City, Utah and grew up in Richland, Washington. He received a B.F.A in 1961 and an M.F.A. in 1963, both from the San Francisco Art Institute.
Hudson is best known for his funk art assemblages, of the late 1950s and 1960s. He has also produced non-objective paintings, ceramics and large steel and bronze sculptures.
Project: inspired painting of or inspired by this piece of art
Step1: draw the most important two things that you saw in the sculpture
Step2: draw two things that you would add to the sculpture, if it was yours, to improve it.
Step3: Draw two shapes, one organic, one geometric into the painting 
Step5: balance one shape on two sides
Step6: add a base
Step7: add one additional item of your choice, hat?
Step 8: using primary and secondary colors, paint your version of “outrigger”
MATERIALS: 
Paint
Paper
imagination


Line Mammals with Victor Vasarely


(because we are beginning a new school year I included my first day introductions)

Introduction: 
I am Mrs Mollie
Let’s talk about art
what is art?
where do we see it?
what should we talk about when we look at it?
color, shape, line, texture, value, hear, see, smell, 
Is Art right and wrong?
mistakes in art: good or bad?
One Rule: do not comment on your neighbors artwork.  
Discussion:
Line: what is a line?
Where do we see lines
what do lines do in art?
How many line scan you name  and where might we see them in life:
zig zag, swirl, straight, thin, thick diagonal, curves, wavy
Shapes: name a shape
how do lines make shapes?
Mammals: you have been talking about mammals in class
what are mammals
where do we see them?
might we see them in art?
show artwork of tangled black and white zebras. 
Victor Vasarely, (vah-zah-RAY-lee)
1906-1997
born Hungarian:
French artist: sculpture, painter printmaker 
He lead the development of the op art movement
Op-Art: an artistic style that uses geometric abstraction
Began painting in 1943
Style is characterized by BRIGHT VIBRANT COLORS geometric forms and suggestive movement
Style influeneced by KANDINSKY and KLEE
Zebra, created by Vasarely in the 1930s, is considered by some to be one of the earliest examples of Op-art
Vasarely died in Paris in 1997
PROJECT: Draw a mammal using shapes fill in with lines
Step1: Pick a mammal in your head and think about what shapes you could use to draw him
Step2: using a pencil, begin to draw your shape mammal
Step3: once completed fill in your shape mammal with spiral lines
Step4: Fill in your background using straight or zig zag lines
Materials:
card stock
sharpies
pencils


Friday, February 25, 2011

Collage Overlapping with Matisse

DISCUSSION: 
still life: group of object placed together in interesting ways
Perspective: near and far
Overlapping: one object covering a portion of another object
Look at Matisse’s work: "Red Interior: Still Life on a Blue Table," by Henri Matisse 45 5/8 by 35 inches, Kunstsammlung Nordrhein-Westfalen, Dusseldorf, 1947
What colors does he choose
   Do they help tell the story
What about the lines he chooses 
What do we know about zig zag lines and the color red?
What story does it tell?
Can we tell what time of year or day it is?
What might it smell like
Do you have any other sensory reaction to the scene?

MATERIALS: 
Construction paper scrappys in all colors
9x12 construction paper for window frame
Glue
Watercolors
Paint brushes
Scissors
sheet of white card stock for our exterior (8x11)

ARTIST: Henri Matisse 
1869-1954
French Painter,
Studied law until he was 21
Mother gave him a paint box after surgery and he discovered painting
He returned to work, and every morning before work, he attended drawing classes; at lunch time he would paint for an hour or so, and then return to work. After work he would paint till night fell. It was his life. 
In 1891 set off for Paris. 
Matisse began his journey of studies which ultimately lead him to his love of line, shape and color. 
Matisse felt that his greatest influence had been the work of the artist Cezanne (1839 – 1906, French). 
In the 1950‘s, Matisse began creating paintings using paint and paper cut outs. 
In his last years, as he aged and fell ill, Matisse continued to paint, this time on the walls of his room, using a piece of charcoal attached to the end of a bamboo pole. He painted until his death in 1954. 
Matisse had strong feelings about only one thing, the act of painting. 
The purpose of these pictures, he always asserted, was to give pleasure. 
For Matisse, painting was the rhythmic arrangement of line and color on a flat plane. 
He had created the technique of striking contrasts, unmixed hues, flat planes of color (similar to Gauguin, 1848 – 1903, French) 
expressive brush strokes (similar to Van Gogh, 1853 – 1890, Dutch). 
Light was expressed, not in the method of the Impressionists, but with a harmony of intensely covered surfaces. 
For additional information please visit: http://en.wikipedia.org/wiki/Henri_Matisse


PROJECT:  Could take two weeks
Step 1: on your white card stock create a view from your window. Use weather from your favorite time of year
Step 2: set your painting aside for it to dry
Step 3: cut out a window frame from construction paper
Step 4: on a large piece of construction paper use marker to create wallpaper
Step 5: cut out a chair or table from construction paper
Step 6: cut out a pet or a vase of flowers from construction paper
Step 7: create a piece of fabric for your table or chair with markers and paper, cut it out
Step 8: cut out a piece of carpet from construction paper
Step 9: glue all of the objects on your page, create depth
Step 10: clean up