Tuesday, December 6, 2011

Form in Wire with Claire Falkenstein


blue tape on the left side of the picture has the students name for identification for upcoming art show. 


Discussion: Form
What is form? 
How is it different then a painting?
what is space?
Negative space?
Positive space?
Claire Falkenstein, 
Body Centered Cubic
on display at the Crocker Art Museum in Sacramento, CA
Claire Falkenstein (1908-1997) 
American artist and sculptor
Through her long and prolific career, Claire explored every medium, from sculpture, drawings and paintings to prints, wallpaper and jewelry. 
An Oregon native who worked in Paris, France, the San Francisco Bay area and Venice, California. 
Falkenstein is best known for her monumental sculptures as well as her more intimately-scaled prints and jewelry. 
Falkenstein experimented endlessly, learning about metals by melting them in spoons over a kitchen stove. 
Soon, she was manipulating gold, silver, platinum, brass, copper and steel into necklaces, brooches, rings as well as large-scale sculpture.
Working in Italy in the late 1950's, she made one of her great discoveries, devising a way to virtually "fuse" glass and metal—two very different materials in behavior and chemistry—into single pieces. 
This combination of materials became the hallmark of her creative production.
While she was working small, Falkenstein was thinking big. 
Gradually abandoning traditional media like wood and clay, she began producing large-scale sculptures, fountains and other structures using innovative glass and metal techniques first explored in her highly experimental jewelry.

SAFETY discussion is necessary for this project. I gave the students 3 feet of wire. If students are too close together someone could get hurt. If you can not spread students out, coil up the wire while children work and remind them at all times to be safe.
Project: create a small wire sculpture with beads
Step1: know that you must be gentle while working with wire
Step2: decide on a shape, our artist used the shape of a square. YOu finished product should be no bigger then your fist
Step3: as you begin to twist and mold your wire into a shape remember your beads 
Step4: add in all beads into your sculpture 
Step5: add in a small colored wire as your last step
Materials:
Beads
Wire 3 feet, Dick Blick wire for students. 
1 Twistezze per child, Dick Blick


Wednesday, November 30, 2011

Sculpture with Bean Finneran


Discussion:
Form
Space
Monochromatic
Artist and 20,000 curves
20,000 turquoise curves
Bean Finneran
On display at Crocker Art Museum, Sacramento, CA
Artist: Bean Finneran (1971-     )
Cleveland Born
Career beginnings in avant-garde theater in Boston
Designed Jewelry in San Francisco
returned to painting 
eventually began to roll and stack clay
Project: Create a sculpture piece inspired by this work of art
Step1: start with a styrofoam florist cone. 
Step2: cut chenille stems in half or close to half
Step3: add a bead on the end of each half and bend the stem so the bead does not fall off
Step4: place the 1/2 pipe cleaner in the cone
Step5: continue working on this project until you have it completed and are happy with the results
Note: Students will study monochromatic color schemes, pipe cleaners will be displayed by color but if a student wants to use multi colored pipe cleaners they will not be discouraged. 
MATERIALS: 
One styrofoam florist cone per student
Multi-colored beads for the ends   http://www.dickblick.com/products/pony-beads/


Tinted Cool Colors and Warm Tree drops with FawazO


DISCUSSION: warm and cool colors
What are they 
Why are the warm or cool?
How do we make colors lighter?
How do we make colors darker?
Whay would we make colors darker and lighter?
Look at the artwork: Tree of Life; http://fawazo.com/
Discuss the artwork
What do you see
How did he make the roots
How did he make the leaves
Does it look like a tree?
ARTIST: Fawaz AlOlaiwat Aka FawazO, Born September 4th, 1977-  
FawazO lived all his life in Bahrain, A small island in the heart of the Arabian Gulf. 
FawazO is an artist born in color, in culture, in a home for inspirations. 
Rooted to a family of artists, he has spiraled and stemmed, sprouting into the sun.
As an award winning artist FawazO has attracted an international appeal. He displays several paintings in galleries abroad (including Denmark and Dubai).  
Acclaimed, appreciated, and still humble, FawazO expresses suppression, love, romance, peace, and the will to be free in his digital creations.  
He tells his art in layers, in textures, in meaningful colors. 
He forms his art to tell a story, to spark imagination, to awaken curiosity, to ignite passion. 
Most recent in his portfolio is a wide collection of Corporate Identities, and Brand Developments.  
His love for creativity has also inspired him to produce Corporate Art, or as the Artist labels it “BrandArt”.  
PROJECT: Create a drip tree using stencil and warm liquid watercolors
Step1: place the stencil over your paper making sure circle is centered; tape it in place
Step2: using droppers or q-tips: drop warm colored watercolors inside the stencil until you are filled with warm drops or dots
Step3: remove stencil
Step4: using oil pastel: draw a line along the foreground of the page living 2 inches below for roots
Step5: using lines draw in tree trunk and roots below surface; draw them as singular lines and dots on roots like the artist
Step6: add white to green and blue tempura paint
Step7: paint in sky by tree do not touch the tree just paint around the circle
Step8: paint in ground below purple line light green
Materials: 
liquid watercolor
White, blue and green tempura paint
dropper or q-tips
circles stencils
blue tape


Discussion: Pattern, Stripes and stars
To have a pattern with stripes, they must repeat. 
Where do we find stripes? what animals have stripes?
Do tree’s have stripes? where are they?
Horizontal, this word means side to side or across. 
Show Warhol’s work of the stripes tree with stars
What do you think of this piece?
Does it remind you of anything?
Where do we find stars?

look at this print of Warhol's:

Andy Warhol
(August 6, 1928 – February 22, 1987), 
Born Andrew Warhola 
An American painter, printmaker, and filmmaker 
leading figure in the visual art movement known as pop art
After a successful career as a commercial illustrator
During this time he created holiday prints for Tiffany's
Warhol became famous worldwide for his work as a painter
He was also filmmaker, record producer, author, 
Warhol has been the subject of numerous retrospective exhibitions, books, and feature and documentary films.
He coined the widely used expression "15 minutes of fame." 
The Andy Warhol Museum exists in memory of his life and artwork.
The highest price ever paid for a Warhol painting is $100 million for a 1963 canvas titled Eight Elvises. 
Died during routine gallbladder surgery in 1987
PROJECT
For this project we are only going to paint STRIPES with our color:
Step1: using your paint brush, paint one stripe on the bottom of your page
Step 2: paint the next color on top of the first but make it slightly smaller on both sides
Step3: paint the next color on top of the first but make it slightly smaller on both sides
step 4; paint the next color on top of the first but make it slightly smaller on both sides
Step5: paint the last stripe at the very top, this stripe should be the smallest
Step6: add stars to each of your stripes
Step7: add one star on top
MATERIALS: 
Liquid watercolor in five colors: red, blue, pink, green and purple
Paint brushes
metallic sticker stars


Tuesday, November 8, 2011

Warm and Cool Color Seascape with Hans Hoffman


This lesson plan is adapted from and earlier lesson plan: Warm and Cool Colors with Van Gogh


DISCUSSION: 
Hans Hoffman and his work Seascape, 1941
This piece is on display at the Crocker Art Museum, Sacramento, CA
What do you see in this piece?
Does it look like a photograph
What colors did the artist choose?
what do you see first when you look at this piece?
Landscape: foreground, middle ground, background and horizon line
line
Warm and cool colors
seascapes
Hans Hofmann (March 21, 1880 – February 17, 1966)  
German-born American abstract expressionist painter. 
He was born in Weißenburg, Bavaria on March 21, 1880 
In 1932 he immigrated to the United States, where he resided until the end of his life.
Hans Hofmann’s paintings bridged the gap between European Modernism at the beginning of the century and Abstract Expressionism a generation later. 
Hired by the University of California at Berkeley in 1930 to teach a series of courses, his curriculum was the most progressive in the state. 
The artist’s combination of Cubist structure and bright Fauvist color, combined with his “push-pull” theories of color and composition, proved revolutionary. 
In California, his views were a decided departure from the way artists were accustomed to thinking and seeing. 
He came to Berkeley through the invitation of Worth Ryder, a former student. In 1932, 
he moved to New York, teaching at the Art Students League and then at his own school. 
In 1958, he retired from teaching to devote full time to painting. 
His late paintings of overlapping squares confirmed his reputation as an internationally important modernist.
Hofmann's work is distinguished by a rigorous concern with pictorial structure, spatial illusion, and color relationships.
His completely abstract works date from the 1940s.
Hofmann believed that abstract art was a way to get at what was really important. 
He famously stated that "the ability to simplify means to eliminate the unnecessary so that the necessary may speak".
PROJECT: students create a warm and color seascape
Step1: students see their vertical page in three parts:background, middle ground, foreground
Step2: Background: using black oil pastel, create a circle sun and a series of vertical stripes
Step3: middle ground: using black oil pastel: students paint in a series of curves that will become mountains
Step4: foreground: using black oil pastel: students draw in a body of water with sail boats
Step5: Background: students color in the stripes in warm colors, orange and yellow using oil pastels
Step6: students color in the middle ground mountains with cool colors of green values in oil pastels
Step7: student color in the sea in values of blue and their sail boats in reds and oranges in oil pastels
Step8: using watercolors paint over the piece with the right colors for each section.
Materials:
12x18 thick white paper
watercolor paint in primary, secondary
oil pastels
black oil pastels


Thursday, November 3, 2011

Pattern Sugar Skulls with Folk Artists


I do not normally encourage coloring pages for any art project but I needed a starting place for this age group. I wanted the preschool students to focus on pattern and not worry about drawing/painting a skull. Time and age were major factors in this decision and the results are wonderful. 


DISCUSSION:  Pattern 
What is pattern? 
Where do we find it? 
What does it need to be a pattern? 
Repetition Who has a pattern on today 
Lets make some patterns on paper. 
Day of the dead Sugar skulls  


ARTIST: Sugar Skulls Artisans, Folk Artists.
Sugar art was brought to the New World by Italian missionaries in the 17th century. 
Mexico, abundant in sugar production and too poor to buy fancy imported European decorations, They learned quickly from the friars how to make sugar art for their festivals. 
Clay molded sugar figures of sheep and sugar skulls go back to the Colonial Period 18th century. 
Sugar skulls represented a departed soul the name is written on the forehead and was placed on the gravestone to honor the return of a particular spirit. Sugar skull art reflects the folk art style of big happy smiles, colorful icing and sparkly tin and glittery adornments. 
Sugar skulls are labor intensive and made in very small batches in the homes of sugar skull makers. 

PREPARATION: for PRESCHOOLERS: print skull coloring page (I used this one: http://www.artyness.co.uk/skull-stencil.html) and glue it to construction paper of any color. 

PROJECT: Create paper sugar skulls 
Step1: fill the eyes with a flower 
Step2: fill the forehead with lines or dots 
Step3: fill the nose with a plaid 
Step4: fill the rest of the face with more patterns. (this is tough for first year preschoolers, age 3 but much easier for 4 and 5 year olds. MOST IMPORTANT that ALL students have fun). 

MATERIALS: 
copy paper with printed skulls 
Construction paper in any color but black 
Glue sticks 
Oil pastels


Monday, October 31, 2011

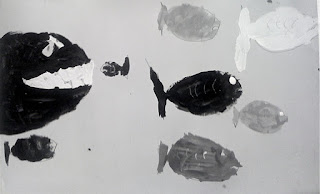
Scale Value Fish with Matt Duffin


Discussion: 
Scale: big and little
What colors has he chosen?
Value chart? what is value?
How do we make colors lighter?
How do we make them darker?
Lines: what lines do we see, what lines can you think of?
Look at Matt Duffin's, Crowd Control, 2006 on display at Crocker Art Museum, Sacramento, CA
Does this painting remind you of a scene in the Wizard of Oz?
What is happening behind the curtain?
Why donkeys? are they smart?
What are they standing?
What is the artist trying to say?


ARTIST: Matt Duffin (1968-)
He grew up in Houston, Texas. 
He received his Bachelor of Science in Architecture from the University of Houston. 
He never practiced as an architect, choosing instead to become an artist. Through art, he found that he could easily combine his tendency toward right angles and persecutive drawing with the more human themes of solitude and irony. 
Over time, his medium has evolved from charcoal to encaustic wax, but he continues to dwell in the realm of dark recesses and stark contrasts. 
PRACTICE: on practice paper try drawing fish. 
First reduce them down to two shapes: triangle, oval
Second: add details: fins, gils, scales, tail lines, 
Now try drawing a very large fish almost the size of your paper
use the same techniques and details but make this fish have its mouth open
remember this is just practice drawing shapes, line and details.
Project: Big Mouth Fish
Step1: using a pencil draw a school of fish, at least 12, all the same on one half of your paper
Step2: On the other half draw a large fish mouth, from the side, big enough to eat the whole school.
Step3: using only black and white paint create 5 shades of grey
Step4: paint in your fish fight drawing using only grey paint.
Step5: using all your light shades of grey add in bubbles around the fish using different sized circles use straws, toothpicks, and bottle caps for the large fish. 
Materials:
12x18 thick white paper
Tempura Black and white paint
Bowls or small cups to make new colors
straws