Showing posts with label cardboard. Show all posts

Thursday, January 4, 2018

Scale Dwelling Model


Lesson Plan Nest Dwelling Model  

OBJECTIVE: 
Design and create an architectural model of a dwelling for a specific species of bird of your choice.

MATERIALS: 
sticks, wooden matches, toothpicks, dowel rods, straws, mat board, cardboard, paper, Foam Core, wire any combination of the above, or similar materials of your choice.

CA Advanced Art Standards
1.3 Research and analyze the work of an artist and write about the artist's distinctive style and its contribution to the meaning of the work.
1.4 Analyze and describe how the composition of a work of art is affected by the use of a particular principle of design.
2.1 Solve a visual arts problem that involves the effective use of the elements of art and the principles of design.
3.3 Identify and describe trends in the visual arts and discuss how the issues of time, place, and cultural influenc
4.1 Articulate how personal beliefs, cultural traditions, and current social, economic, and political contexts influence the interpretation of the meaning or message in a work of art.
4.5 Employ the conventions of art criticism in writing and speaking about works of art.
5.2 Create a work of art that communicates a cross-cultural or universal theme taken from literature or history.

DISCUSSION: 
  • An architectural model is a type of scale model - a physical representation of a structure - built to study aspects of an architectural design or to communicate design ideas.
  • Architectural models are a good way of presenting a 3D version of your architectural design, interior design, or urban design project. 
  • They give you a sense of how the different elements will feel in reality combined together
  • SCALE: In art the size relationship between an object and the human body is significant. In experiencing the scale of an artwork we tend to compare its size to the size of our own bodies. 
  • Proportion refers to the relative size of parts of a whole (elements within an object, i.e.: your face). 

ARTIST: 
Tim Prythero
  • Creates miniaturized structures that record nostalgic moments in time
  • Small worlds are simple but powerful and dramatic 
  • Favorite subjects include gas stations, trailer parks, diners, and architectural kitsch. 
  • He researches his subjects and spends hours carving and assembling and hand painting his environments.  


ARTIST:
  • M. Pei was born in China on April 26, 1917. 
  • In 1935 he began studying architecture in the United States 
  • He earned his B.A. from MIT and his M.A. from Harvard. 
  • He started his own architectural firm in 1955, Pei designed such well-known structures as the Kennedy library, the glass pyramid at the Louvre. 
  • Pei continued to design impressive buildings during the 1990s, including the United States Holocaust Memorial Museum in Washington, D.C., and the Rock and Roll Hall of Fame in Cleveland, Ohio.
  • Now in his nineties, Pei continues to design innovative structures throughout the world. 
  • He has countless honors for his work within the field of architecture.
  • In December 1992, Pei was awarded the Presidential Medal of Freedom by President George H. W. Bush

PROJECT REQUIREMENTS:
Student will research a bird of their choosing
Based on that specific species birds habits, needs, etc., student will design (sketchbook) and build a scale architectural model of the bird's habitat. 
This habitat should not be traditional. Be creative. 
In the design, include a visual reference to at least one characteristic of the bird AND an element that references a specific human-made architectural structure. 

Additional Resources
You may want to explore the work of  Frank Gehry, Zaha Hadid, Moshie Safdie


Friday, August 5, 2011

Printmaking Geometric Animals with Roberto Montenegro


PREPARATION: as students arrive for class ask them to brayer one color onto the paper
we used grey for this project

Take a look at: 
Jaguar and the Moon
Oil on canvas, circa 1950s. 
By Roberto Montenegro Crocker Art Museum

DISCUSSION: 
what do you see here?
Is it flat?
Does it appear to be made from paper?
What about the colors the artist chose?
How many colors?
What is the purple shape?
Why did the artist chose purple for the moon?
Why is the jaguars head Black and the rest of it’s body yellow?
What about the shapes and dots around the Jaguar?
ARTIST: Roberto Montenegro Nervo (1885-1968) 
he was a Mexican painter, illustrator, and stage designer.
In 1903, Roberto Montenegro began studying painting in Guadalajara under Felix Bernardelli, a Brazilian-Mexican artist
He lived in Mexico City, and in 1904 began studying architecture
It wasn't long after he abandoned it to study at the Academia de San Carlos under many talented artists
Some of his fellow students were Diego Rivera and Francisco Goitia.
An influential promoter of popular arts, Montenegro organized events like the first popular arts festival which was held in 1921. he also published "Pintura Mexicana del Periodo 1800-1860" in the 1930
PROJECT: printmaking animals
Step1: Encourage students to see any animal as a series of shapes. ex: cat: two triangles for ears, circle for a face, oval for a body, rectangles for legs. add pieces of sticky foam to create the shape of any animal
Step2: For the cat: cut out two triangles and place them on the top of the card board piece


Step3: continue adding shapes to your cardboard until you have your whole animal created.
Step4: On a small piece of cardboard create a shape to be added around your animal like a moon or stars
For printing: LIMIT COLOR CHOICES FOR THE STUDENTS. we were able to choose form three red, yellow or blue.
Step3: Print your animal on your prepared paper using one color for the animal and one for the shape
Step5: using a q-tip add dots in and around your animal
Step6: using forks, wine corks and any additional items, add pattern in your background
Materials,
Paper in white black or grey or all three
Paint
Sticky foam rectangles
cardboard base
q-tips
scissors
cork
forks


Wednesday, January 27, 2010

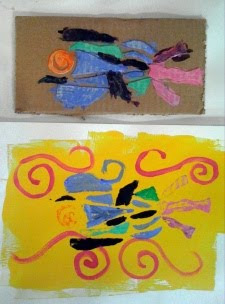
Fish printmaking with J. Vincent Scarpace 3-5 grades


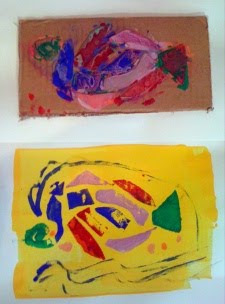
The yellow pieces in the above photos are the finished work. The art above is the cardboard with the flexi-cut pieces on top that the students created to print.

DISCUSSION: printmaking: what is it? Why is it so important in art?
Complimentary colors and value are very important in today’s artwork

Look at the artwork of Vincent Scarpace:
What do you think
What is he inspired by?
What do you see first in the work?
What about the colors he used?

J. Vincent Scarpace
1971-
American Artist
Born: Buffalo, New York
His original works are “a personal journey through the use of basic of art elements: line, shape, and color - resulting in an arrival, just past experimentation, at unique works of art which purposely resemble fish.”
He’s followed his passion for the creative process, the pursuit of one’s own creative potential.
J. Vincent knew from an early age exactly what he wanted to do with his life.
encouraged from about age 2 to pursue line, shape, and color, and the creation of art.
J’s mother, an artist in her own right, taught young J. Vincent how to enjoy drawing, painting, and sculpture very early on.
Having worked as an apprentice, production artist, and studio artist .
J. Vincent holds a BS in Education (Art and Education),
after several years of teaching in both private and public schools, he’s now a former teacher, "retired" very early, to his studio to continue his creative journey and drive toward the creation of unique works of abstract fish art. Today, J. Vincent Scarpace’s original works can be found in private and public collections in over 40 countries and in all 50 U.S. States.
He is currently in art galleries, in numerous restaurants, and in many corporate and professional collections. J. resides in College Station, TX

For additional artist information, please visit: http://www.ipaintfish.com/

PROJECT: Create a fish like our artist that we can print
Step1: paint a background for your fish with a brayer using one BRIGHT color Yellow is perfect
Step 2: begin to cut out pieces of your sticky foam and form it out your card board to create a fish. REMEMBER: place next to each other, NOT OVERLAPPING, like a mosaic
Step3: Start with the eye. a large circle or swirl
Step4: create a body frame by cutting out a smile and a frown. place them on top of each other creating an oval shape
Step 5: fill the inside of the fish with shapes
Step6: create gills and fins
Step7: create a mouth
Step8: paint your fish with all different colors REMEMBER to use colors OPPOSITE on color wheel from your background
Step9: print your fish onto your background
Step10: add dots, swirly fins, lines, and other details with a q-tip

MATERIALS:
Flexi cut by the yard available at dick Blick: http://www.dickblick.com/products/blick-flexi-cut-printing-plates/

paint brushes Large and small
Cardboard
water
White tag board
Tempura paint
Q-tips