Showing posts with label space. Show all posts

Saturday, March 11, 2017

Art Element Cup


Lesson Objective: Introduction to the art elements through a styrofoam cup

Key Vocabulary: 

Materials: 
Styrofoam Cup
Xacto Knife 
Hot Glue 

Focus: Elements of Art 

CA Art Standards:
1.1 Identify and use the principles of design to discuss, analyze, and write about visual aspects in the environment and in works of art, including their own.
1.3 Research and analyze the work of an artist and write about the artist's distinctive style and its contribution to the meaning of the work.
2.1 Solve a visual arts problem that involves the effective use of the elements of art and the principles of design.
2.2 Prepare a portfolio of original two-and three-dimensional works of art that reflects refined craftsmanship and technical skills.
3.3 Identify and describe trends in the visual arts and discuss how the issues of time, place, and cultural influence are reflected in selected works of art.
4.3 Formulate and support a position regarding the aesthetic value of a specific work of art and change or defend that position after considering the views of others.
5.0 Connecting and Applying What Is Learned in the Visual Arts to Other Art Forms and Subject Areas and to Careers

Modifications: 
English Language Learner: Handout for project, project samples, Power point with visuals, Critique for additional understanding, Demonstration of techniques
Special Needs: Handout for project, project samples, Power point with visuals, Critique for additional understanding, Demonstration of techniques
Accelerated Learner: Expand on skills learned to create a unique project. 

Scaffolding adaptations: 
Students will revisit art elements from the earlier learning. We will use similar visuals to refresh previous knowledge.  Notes will be taken throughout discussions for added understanding. Creating sketchbook plans and Constructing final project will be demo started in class using guided instruction.

Direct instruction: Art Elements: 

LINE
What is a line?
Geometrically, it connects two points. 
A line is a path traced by a moving point, i.e. a pencil point or a paintbrush. 
We see lines all around us. 
Line is a vital element of any artwork.
Actual 
Implied
Contour
Horizontal 
Vertical
Diagonal
Flat
Sharp/Angled
Gestural 

Actual Line: Marks or objects that are real lines; they exist physically. 
Examples of actual lines include lines painted on a highway, tree branches & Ladder.
Contour lines define the edges of objects:
Edges of a table
Edges of figure

Contour lines define both the edges of the object & the negative space between them
Implied Lines
Lines that we see in our mind’s eye that fill in the spaces between objects: 
Rows of windows in a large office building.
Outside line between fruit and background 
Sharply angled lines: Excitement, Anger, Danger & Chaos.
Gestural lines: reveal the touch of the artist’s hand, arm--and sometimes the entire body—in the artwork.
PROJECT: In Your sketchbook: 
Use your pencil
Draw three 3” squares
Try different ideas with a focus on LINE. 
How will you transition your line ideas to the cup? 

SHAPE: 
A shape is a closed line. A shape is flat.
The easiest way to see the shape of an object:  look at shadows. 
Shadows flatten a 3D object into a flat shape. 
Shadows enable you to see the object without details like color and texture.
Geometric Shape
Organic Shape
Implied Shape
Hard edge shape
Soft edge shape

Geometric shapes are mathematically determined
Organic shapes are the type you see in nature.
Implied Shape: The spaces between objects. We see those spaces as shapes, even though they are Implied. 
Hard Edged Shape: are clearly distinguished from each other 
Convey a sense of: 
order
clarity
strength.
Soft Edged Shape
Soft edged shapes have a tendency to blend with each other or the ground
Convey a sense of:
fluidity
flexibility
tend to feel lighter in weight.
PROJECT: In your sketchbook: Plan your cup using SHAPE
Use at one type of shape we discussed
organic
geometric
implied
hard edge
soft edge
When you have a concrete sketchbook plan completed/approved
Complete your plan using Practice cup and scissors 
If time allows, You can revisit: Line.

COLOR: 
Color has a huge effect on our daily lives.
Everyday our emotions, moods,  physical sensation (appetite) are influenced by the colors that surround us.
Primary: Red, Yellow, Blue
Secondary Colors: Green, Violet, Orange
Tertiary Colors: Yellow-Green, Yellow-Orange, Blue-Green, Blue-Violet, Red-Violet, Red-Orange
Complementary Colors
Colors Opposite on the color wheel: 
Red and Green
Yellow and Purple
Blue and Orange
High Contrast 
Draws attention
Analogous Colors
Colors Next door on the color wheel:
  Green and blue
Yellow and orange
Violet and red
Analogous colors blend with each other.

PROJECT: In your sketchbook: Plan your 3” Color cube side
Use at least two color schemes we discussed
Primary
Secondary
Tertiary 
Complementary
Analogous
When you have a concrete plan in place in your sketchbook:
Pick one of the 6 sides of your cube
Complete your plan using any materials provided 

VALUE : TINTS AND SHADES. VALUE is the lightness or darkness of a hue (color).
Pure Color (Hue) is located in the center of a value scale.
No added white or black
Color from the tube. 
Create lighter value by mixing white with pure color: This is called a TINT.
Create darker values by mixing black  with the Pure Color: This is called a SHADE.  

PROJECT: 
Create a Value Scale 
Hold your pencil in the middle to create a medium (pure) hue. 
Tint: Hold your pencil near the eraser
Shade: Hole your pencil near the lead. 
Create a five block value scale 
In your sketchbook: Plan value idea for the cup
Use value scale techniques we discussed
Add white and black to paint to show value scale
Use varying pressure with pencil to create value scale
 Use both techniques

When you have a concrete plan in place in your sketchbook:
Get it approved
Complete your plan using any materials provided 

Texture: The surface quality that can be seen and/or felt
Texture can be rough smooth soft or hard. (Actual) 
Textures do not always feel the way they look (visual).
The illusion of having physical texture.
Texture in 2D artwork
Artist gives the look of texture through the medium. 
Actual texture: the tactile qualities of the physical surface of the object. 

Differentiates from visual texture: It has a physical quality that can be felt by touch. 

PROJECT: In your sketchbook: 
Plan your texture for your cup
Use the two texture types we discussed
Visual
Tactile or Actual Texture

When you have a concrete Sketchbook plan approved 
Apply idea to your cup
Complete your plan using any materials provided 

SPACE: Positive shapes occupy positive space. 
The area around positive shapes (the background) is negative space. 
In this diagram, the negative shapes are as clear and distinct as the positive shapes.
Negative space: is the space around/between the subject(s) of an image. 
Negative space is most evident when the space around a subject forms an interesting/relevant shape. 
In this case, the NEGATIVE space: The Arrow. 
Space is  always a part of artwork
The setting a sculpture is in becomes part of how it is viewed and the overall effect 
Implied Space: Illusion. In two-dimensional (2D) work

PROJECT: In your sketchbook: Plan how you will show space in your cup
Use the types of Space we discussed
Positive/Negative
Implied
Overlapping
Size
Linear perspective 
When you have a concrete plan in place in your sketchbook:
Complete your plan using any materials provided 

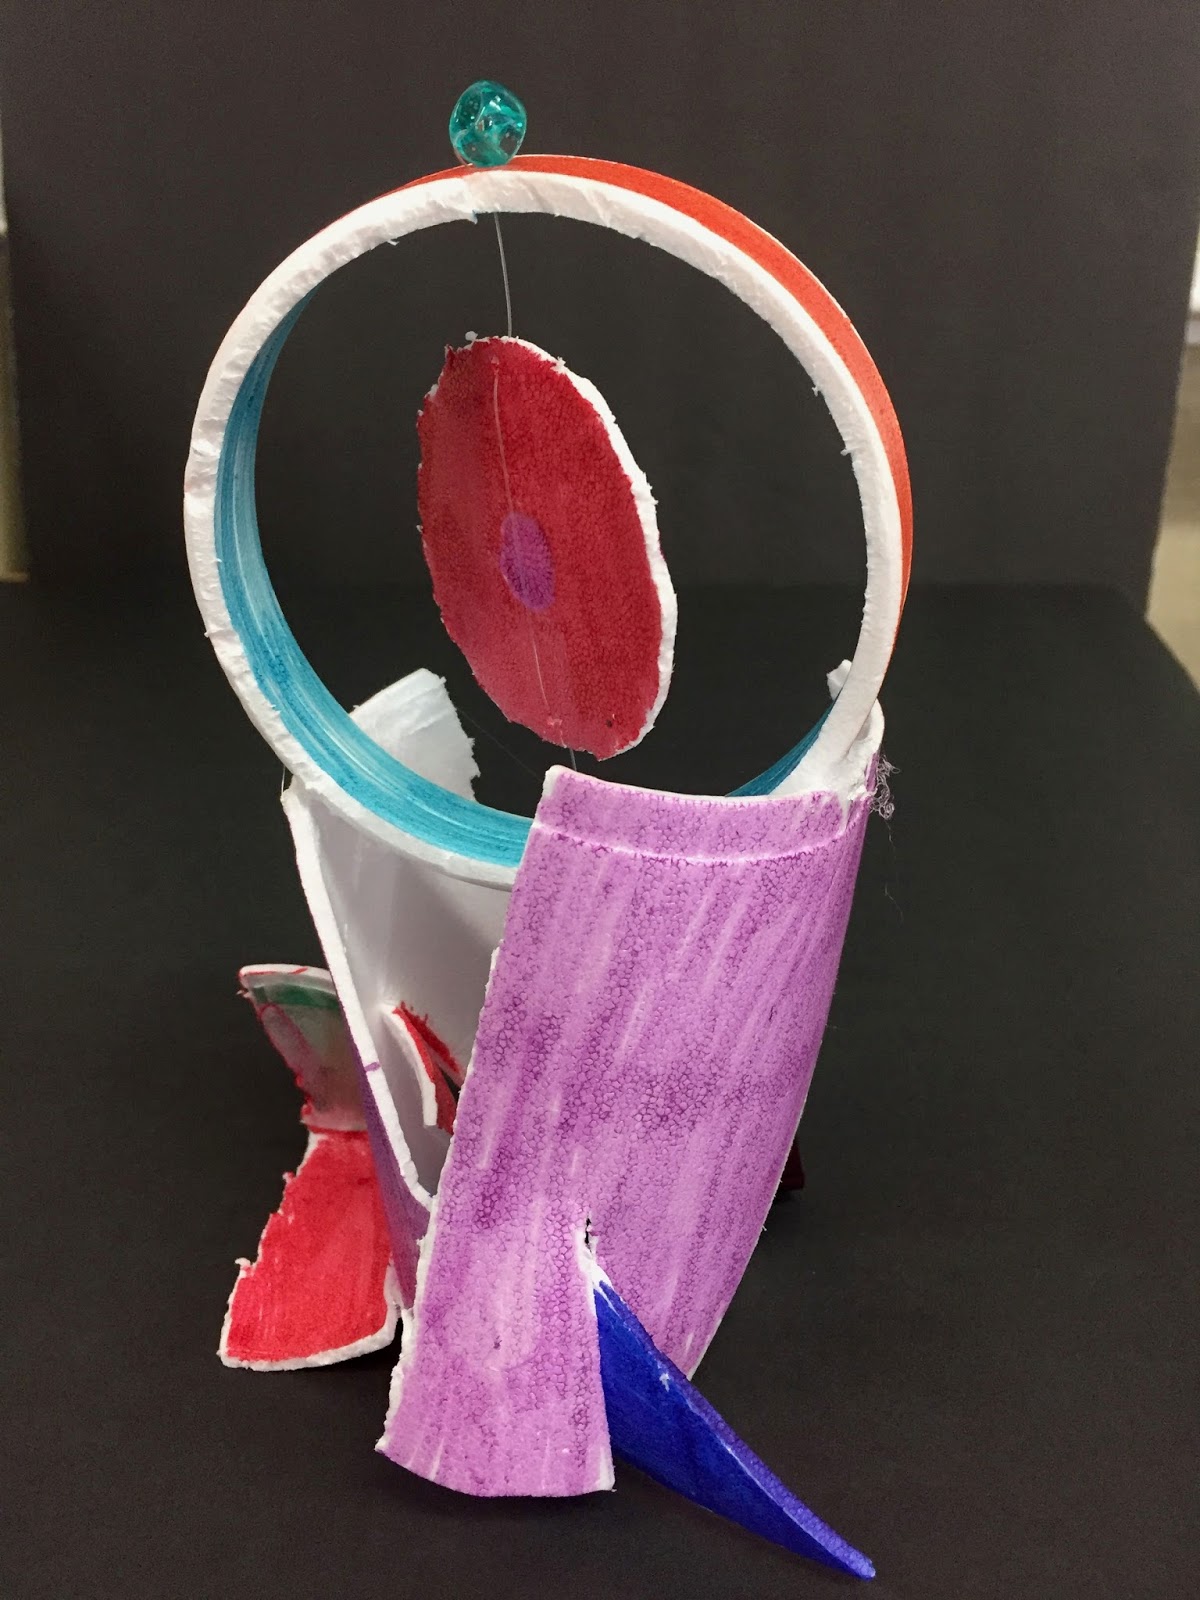
FINAL PROJECT REQUIREMENTS: 
Design and create Art Elements Cup
Create sketchbook study of each element decision 
Complete each aspect of the cup with art elements based on knowledge gained in class discussions
Revise and refine final cup using various supplies provided 
Final cup should become a sculpture, must use all pieces of cup


Monday, September 2, 2013

Wire Sculpture with Alexander Calder


Art Link: 
What is Form
Compare and contrast Form to art we have created in the classroom

INTRODUCTION to lesson (Anticipatory set): 
Analyze the pillow artwork by Mathilde Roussel
Use Critique/discussion form to enhance conversation
Think-Pair-Share 
Group discussion about this work of art

OBJECTIVE: Using uncut Wire, create a piece of art inspired by Alexander Calder. Include Form Space and balance in the final work of art. 
Discuss with table form and space as pre-assessment
Discuss and practice drawing your final project on paper
Work closely with teacher before receiving wire
Students will understand new vocabulary as is relates to visual art: 
Form Space Balance Relief Sculpture 
Mobiles High Relief Middle Relief Ladder perspective
Low Relief Space shapes Free-standing sculpture
Linear perspective Mobile Kinetic Stabiles

CA STANDARDS: 
1.1 Identify and use the principles of design to discuss, analyze, and write about visual aspects in the environment and in works of art, including their own.
1.4 Analyze and describe how the composition of a work of art is affected by the use of a particular principle of design.
2.1 Solve a visual arts problem that involves the effective use of the elements of art and the principles of design.
2.2 Plan and create works of art that reflect complex ideas, such as distortion, color theory, arbitrary color, scale, expressive content, and real versus virtual. 
3.3 Identify and describe trends in the visual arts and discuss how the issues of time, place, and cultural influence are reflected in selected works of art.
4.5 Employ the conventions of art criticism in writing and speaking about works of art.
5.2 Compare and contrast works of art, probing beyond the obvious and identifying psychological content found in the symbols and images.

PURPOSE: complete a wire sculptue addressing elements and principles of art

INSTRUCTION: 
Students will discover review the elements of art, explore, form, space and balance, look at the artwork of Alexander Calder and create a wire sculpture piece as a final art project. 

MATERIALS: four feet of wire per student
Sketch paper
Pencils

DIRECT INSTRUCTION:
Power Point Presentation FORM
Pre-assessment: Sketchbook: 
How does this art effect you? 
Opening: Art Link: What is Form activity
Review: Elements of art 
Discussion: Form, Space, Balance
Space: Overlapping
Ladder perspective
Linear perspective
Form and Sculpture
Relief Sculpture
Free Standing Sculpture 
Space and sculpture
Review Principles of Art
Balance
Symmetry
Asymmetry
ART HISTORY: ALEXANDER CALDER
Expressionist
Began with wire circus
Invented Mobile
VIDEO: Calder’s Circus
Wire sculptures
Describe, Interpret, Analyze
Calder had plans in his sketchbook
Teacher Models: 
Form, Space and Balance throughout discussion 
Students take notes in their sketchbooks 
Teacher Monitors throughout discussion
Check for Understanding: 
Monitor room during Pre-assessment in sketchbook
Monitor throughout discussion to be sure notes are being taken 

FINAL PROJECT: Students will create a wire sculpture in the style of Alexander Calder
Sculptures must be in the shape of a box and have objects inside
Wire may not be cut, students will solve the problem of the wire in its 
full length
Students will draw and submit three plans for their wire before receiving 
Wire. They must consider measurements, interior content Form,   Space and Balance. 


Saturday, January 12, 2013

Negative and positive Space with Mathilda Roussel


Discussion
Positive space and Negative
What is positive space? 
When we cut something out positive is the object
Negative is the hole
In a sculpture positive space is the materials
Negative space is the holes in and around the work
Space is also the distance between points and planes in an artwork

What do you think of this piece? 
What is positive
What is negative
What is the work made from? 

ARTIST: Mathilde Roussel (Ma-tit   Rou-sel) 
French artist based in Paris. 
Her work is a sensible and symbolic research about the nature of physical life. 
She is interested in the cyclic metamorphoses that transform organic matter, whether vegetable, animal or human. 
Roussel interrogates the ways in which time weighs on our body, leaving its traces as an imprint and thus creating an invisible archive of our emotions, a mute history of our existence. 
She uses a diversity of materials from paper to fabric, from rubber to graphite. 
Her ephemeral sculptures she uses organic matter such as wheat grass, pollen, sap or milk. Her work becomes a mapping of the body, an anatomy of the time and space inhabited by our fragile presence in the world.

PROJECT: 
Step1: Fill your paper with different colored tissue paper. Glue them down
Layer and overlap to show change in color
Step2: Using a second paper cut out a shape, any shape and throw the shape away
Keep the hole
Step3: Layer the hole on top of the paper with the tissue. Glue it top top
Step4: crop the sides if needed. 

MATERIALS
Tissue
Two pieces of card stock the same size
Scissors
Glue


Wednesday, November 30, 2011

Sculpture with Bean Finneran


Discussion:
Form
Space
Monochromatic
Artist and 20,000 curves
20,000 turquoise curves
Bean Finneran
On display at Crocker Art Museum, Sacramento, CA
Artist: Bean Finneran (1971-     )
Cleveland Born
Career beginnings in avant-garde theater in Boston
Designed Jewelry in San Francisco
returned to painting 
eventually began to roll and stack clay
Project: Create a sculpture piece inspired by this work of art
Step1: start with a styrofoam florist cone. 
Step2: cut chenille stems in half or close to half
Step3: add a bead on the end of each half and bend the stem so the bead does not fall off
Step4: place the 1/2 pipe cleaner in the cone
Step5: continue working on this project until you have it completed and are happy with the results
Note: Students will study monochromatic color schemes, pipe cleaners will be displayed by color but if a student wants to use multi colored pipe cleaners they will not be discouraged. 
MATERIALS: 
One styrofoam florist cone per student
Multi-colored beads for the ends   http://www.dickblick.com/products/pony-beads/


Wednesday, October 26, 2011

Warm and Cool Hearts with Jim Dine


PREPARATION: precut Heart stencils from card stock and tape them to the table. Students will slip their paper underneath. 

DISCUSSION: Warm and Cool Colors
What are warm colors?
How do they make us feel?
Where/When do we see them?
What are cool colors?
How can they make us feel?
Where/when do we see them?
ARTIST
Jim Dine born June 16, 1935
He is sometimes considered to be a part of the Neo-Dada movement. 
He was born in Cincinnati, Ohio
He attended the University of Cincinnati and received a BFA from Ohio University 
 He first earned respect in the art world with his Happenings
Pioneered with artists Claes Oldenburg and Allan Kaprow, the "Happenings" were chaotic performance art that was a stark contrast with the more somber mood of the expressionists popular in the New York art world. 
In 1962 Dine's work was included, along with Roy Lichtenstein, Andy Warhol and Wayne Thiebaud, in the historically important New Painting of Common Objects.
This exhibition is historically considered one of the first "Pop Art" exhibitions in America
Jim Dine’s Hearts were included in this exhibit
PROJECT: create oil pastel heart with stencil  
Step 1: name on paper
Step2: place stencil on paper and tape down
Step3: Color inside the stencil with warm oil pastels
Step4: remove stencil
Step5: fill in background with cool color of water colors
Step6: place on drying rack
MATERIALS:
Heart stencils
Oil pastels
Liquid watercolors in cool colors


Sunday, September 19, 2010

Duct tape artwork with Rebecca Ward


DISCUSSION: 10:45-11
Can tape become artwork?

Discussion ideas:
line
space
living artwork
installation of artwork
history of duct tape
If we have a lap top we can show the kids an installation video…
ARTIST: Rebecca Ward: 
(1984-    ) 
American Artist
Installations are site-specific works dependent upon the space they occupy. 
Utilizing existing lines, beams, and angles, each piece I create is informed by the individual site and its unique linear movement.
She chooses patterns and shapes according to detailed measurements of the installation site. 
Ideally these patterns are numerically symmetrical or somehow numerically balanced, producing a dialogue between line and space. 
She began working with tape because of the broad range of colors in which it is available. 
Additionally, I have always been drawn to its unique textural qualities.
She makes videos to create a dialogue with the tape installations. 
She sees the videos as a way to animate the tape installations, and further explore my architectural manipulation of space. 
When using tape, rather than leaving evenly-placed two-dimensional lines upon a wall, I expand upon the material’s sculptural potential and bring these installations into a third dimension. 
When using video, she angles projectors and uses multiple intersecting projections to create animated, two-dimensional shapes. This creates an illusionary space, a perceptual play of pattern, color, light, and texture that is realized by the viewer’s experience of, and interaction with the work.
EXAMPLE of her work below

for more information and art examples: http://www.rebeccasward.com/
PROJECT: 11-12
Create a unique piece of art using tape on card stock
Step1: take a moment to think about what you would like to create
A picture of something
Lines and shapes
Step2: pick colors of tape you would like to use
Step3: using scissors begin to cut the tape in the right sizes and shapes for your ideas
Step4: begin to create your piece on paper
MATERIALS:
Duct Tape
Card stock